
نشكرك على اختيار BlogrCart سبعة مستعرض Blogger / Blogspot التجارة الإلكترونية موضوع التسوق. يمكنك العثور على كل ما يتعلق بهذا الموضوع والتخصيص والنصائح لتحسين نشاطك التجاري أو متجر الويب / المدونة الشخصية.
يتضمن تنزيل الموضوع ، سيكون لدى المستخدمين محتويات عينة للعمل بها. وهذا يشمل جميع تفاصيل القطعة مع أمثلة كما يتم عرضه في العرض التوضيحي. يمكنك بسهولة إضافة وتعيين النص / الإعدادات المخصصة وفقًا لذلك - فلا حاجة إلى برمجة!
هذه الوثائق سوف توجهك مع: -
يمكنك الاطلاع على الإرشادات التفصيلية حول كيفية تحميل وتثبيت موضوع / نموذج في Blogger ، وتحميل محتويات نموذج ، وإعدادات مدونة شيقة قد تراها ، وأتمتة الإعدادات الافتراضية للنشرات تلقائيًا باستخدام نموذج النشر التلقائي والمزيد.
Set blog settings to
Make Blog

This theme is designed with a responsive framework & do not require the usage of Blogger mobile template. Turn off Blogger mobile theme by:-


تلعب العلامات الوصفية دورًا حيويًا في إعطاء موقع Blogger (والصفحات) دفعة إضافية في صفحات نتائج محرك البحث. لتنشيط العلامات الوصفية في الأوصاف الوصفية للمدونة وصفحة المنتج: -
ستؤدي إضافة علامات وصفية هنا إلى تنشيط

يمكنك تعديل النص أو تحميل الصور لتخصيص مظهر متجر Blogger باستخدام عناصر واجهة مستخدم Blogger المثبتة مسبقًا مع المظهر. يمكنك إضافة عناصر واجهة مستخدم Blogger أو إزالتها أو إعادة ترتيبها لتخصيص التنسيق.
استخدم إعدادات أداة Blogger Blog لتخصيص وظائف النشر في Blogger المختلفة والتي تشمل: -
في صفحات نشر المدونة ، يتم تضمين كل ذيل المشاركة. ولكن على صفحات المنتج ، تم حذف بعض وظائف post poster الافتراضية لأسباب تتعلق بالأداء.
تنشيط وظيفة Poster في Blogger المتاحة من لوحة المعلومات في أداة Blog1.
تم تثبيت أداة الوصول السريع مسبقًا مع هذا المظهر. هذا سوف يسمح لك: -
لتمكين هذه الوظيفة ، انتقل إلى


هذا هو عنصر واجهة مستخدم Blogger Label مخصص وموجود / تم تعيينه أعلاه
لتعيين تسمية محددة للعرض ، في القطعة المعينة ...
يعرض قسمًا نصيًا عامًا في صفحات المنتج أسفل سمات / بيانات المنتج. سيعمل هذا التبويب / الدرج مثل العرض على تجميع جميع عناصر HTML / Javascript المصغرة وعرضها كميزة درج كلفي لمشاركات المنتجات.
 .
.
Displayed on the left/right side on index pages & static page. Add/ remove/ arrange any Blogger widgets accordingly. Some default Blogger widgets custom styles have already been pre-assigned.

Two sidebar section available to display on separate pages.
Display a social media icon: Facebook
Display a social media icon: Facebook (squared)
Display a social media icon: Facebook (3x larger than the font size)
Display a social media icon: Facebook (squared & 3x larger than the font size)
Select or choose over 500+ icons by using the icons "
Add/ remove/ arrange any Blogger default widgets here accordingly. Some default Blogger widgets custom styles already has been pre assigned.
Upon initial theme install, sample Blogger widgets have been assigned. You can activate these widgets by clicking the
Users can add in more widgets by clicking the

Display a social media icon: Facebook
Display a social media icon: Facebook (squared)
Display a social media icon: Facebook (3x larger than the font size)
Display a social media icon: Facebook (squared & 3x larger than the font size)
Select or choose over 500+ icons by using the icons "

Quick Recap:
إعداد متجرك في Blogger واستخدام العديد من ميزات التجارة الإلكترونية التي تأتي مثبتة مسبقًا مع مظاهر BlogrCart.
جميع إعدادات المتجر متاحة في Layout ، وابحث
Whereas USD is referred to your store currency. Below are preset currencies pre-installed with this BlogrCart theme.
Paypal Supported currencies
Paypal Unsupported Currencies
This theme fully supports alternative currency format to display decimals, delimiter & calculate accordingly. For example when IDR (Indonesia Rupiah) currency is in use.
Set above variable to
Setting up currencies not listed above can be done by tapping in the currency function. Add below functions inside any HTML/javascript widget at the very bottom of theme:-
The variables above is self-explanatory. Edit accordingly to override any default currency set earlier.
The tax rate to be applied at checkout. The value is percentage where ie.
Add
To allow tax to be calculated with shipping. Set to
The email used to receive transactions at Paypal. Use this default email address for testing purposes.
The return URL after a successful transaction at Paypal.
The return URL if transaction at Paypal is unsuccessful. This URL will automatically applied at Paypal checkout page
For non supported store currencies who wish to auto convert to USD at Paypal, add below variables inside MY_STORE setup:-
Variable Description
The currency rate to USD from current store currency.
Allows to "quietly" send a copy to store email if value is
Add below CSS at
Then click
Go to
Applies if you have setup a different success page URL after the template Pages install.
This theme comes with theme utility helper to empty shopping cart automatically after a successful checkout form submission.
To empty the shopping cart automatically, at any static/post page in your blog, add the theme utility helper below inside the blog page editor body in the HTML view.
Click
Go to
Edit or add any text inside this widget will display at shopping cart pop over modal.
تجاوز تكوينات موضوع الافتراضية BlogrCart باستخدام المتغيرات دون أي برمجة ! قائمة المتغيرات المعينة والقيم المتاحة لتتضمن مع وصف التفاصيل.
يتضمن تنزيل الموضوع ، سيكون لدى المستخدمين محتويات عينة للعمل بها. وهذا يشمل جميع تفاصيل القطعة مع أمثلة كما يتم عرضه في العرض التوضيحي. يمكنك بسهولة إضافة وتعيين النص / الإعدادات المخصصة وفقًا لذلك - فلا حاجة إلى برمجة!
هذه الوثائق سوف توجهك مع: -
- مدون موضوع / قالب قوالب المنشآت.
- تخصيص تنسيقات السمات والأدوات.
- إعداد مخزن.
- إضفاء الطابع الشخصي على الموضوع عن طريق تجاوز التكوينات الافتراضية.
- تحسين المظهر لمحركات البحث.
Doc Ver: 1.1 - Last Updated 19 July 20171.0 تركيب الموضوع
يمكنك الاطلاع على الإرشادات التفصيلية حول كيفية تحميل وتثبيت موضوع / نموذج في Blogger ، وتحميل محتويات نموذج ، وإعدادات مدونة شيقة قد تراها ، وأتمتة الإعدادات الافتراضية للنشرات تلقائيًا باستخدام نموذج النشر التلقائي والمزيد.
ابحث عن ملفات النماذج في جهاز الكمبيوتر الخاص بك
الطريقة الأسهل (والمفضلة) هي إعداد قالب Blogger بطريقة النسخ واللصق. إليك الطريقة...
بعد النسخ ، انتقل إلى لوحة تحكم Blogger ...
جميع الإعدادات المتاحة متاحة مع رموز الموضوع. يتم تثبيت الصور المنزلقة للنصوص والنصوص والمحتويات مسبقًا لمزيد من التحرير. يمكنك أيضًا التخصيص وفقًا لذلك مع التعليمات التفصيلية في القسم 2.
استخدام نموذج بلوق / تخزين محتويات باستخدام ملف المقدمة في تنزيل السمة. لتحميل محتويات عينة الموضوع: -
يمكنك إزالة / حذف نماذج من الصفحات في مراحل لاحقة بمجرد التأكد من عمل القالب بنسبة 100٪ على النحو المطلوب. هذا يساعد حقا على تسريع قائمة المنتجات الخاصة بك وإعداد مخزن!

في ما يلي مثال على الصفحات التي تم إنشاؤها مسبقًا على تثبيت هذه الصفحات. يمكنك إزالة عمليات نشر المنتج النموذجية عندما تكون قد اختبرت جميع الوظائف أو إعداداتك المخصصة.

extract theme zipped file ولعرض مجلدات القوالب والملفات الداخلية.طريقة النسخ واللصق (مفضل)
الطريقة الأسهل (والمفضلة) هي إعداد قالب Blogger بطريقة النسخ واللصق. إليك الطريقة...
- افتح ملف القالب الذي تم تنزيله
- البحث عن
.../Upload/Templateمجلد - البحث عن ملف القالب &
Open its content using a basic text editor Select All(محتويات لوحة المفاتيح Ctrl + A لـ Windows / Cmd + A لـ Mac)Copy(انقر بالماوس بالماوس + نسخ) محتويات الملف.
بعد النسخ ، انتقل إلى لوحة تحكم Blogger ...
- في
Blogger Dashboard> انقر علىTheme - انقر
Edit HTML Select Allرموز القالب الموجودة عن طريق النقر في أي مكان داخل رموز القالب والنقر بزر الماوس الأيمنSelect All- الآن
PASTEمحتويات القالب المنسوخة. - انقر
Save Templateومعاينة.
جميع الإعدادات المتاحة متاحة مع رموز الموضوع. يتم تثبيت الصور المنزلقة للنصوص والنصوص والمحتويات مسبقًا لمزيد من التحرير. يمكنك أيضًا التخصيص وفقًا لذلك مع التعليمات التفصيلية في القسم 2.
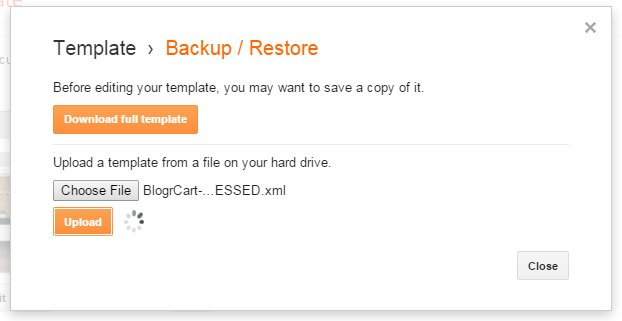
تحميل ملفات قالب (غير مستحسن)
UNZIP/EXTRACTوتحميل باستخدام لوحة تحكم Blogger> Template> Backup/Restore> في Upload a template from a file on your hard drive. > انقر فوق Choose Fileزر. معاينة القالب الجديد الخاص بك.
تحميل صفحات نموذجية (مهم)
استخدام نموذج بلوق / تخزين محتويات باستخدام ملف المقدمة في تنزيل السمة. لتحميل محتويات عينة الموضوع: -
- في لوحة التحكم في Blogger ، انتقل إلى
Settings - حدد
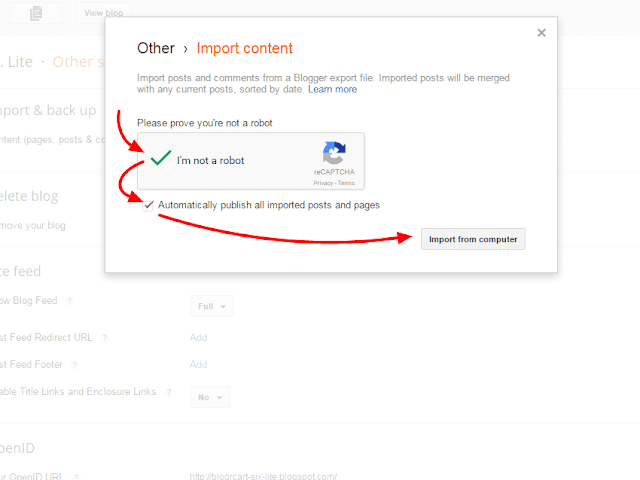
OthersوفيImport and Backupانقر علىUpload Contentزر - في النافذة المنبثقة ، حدد مربع Captcha وحدد
Automatically publish all imported posts and pagesالخيارات. - الآن انقر فوق
Upload from Computerالزر. - ستظهر نافذة أخرى تظهر للبحث عن ملف القالب للتحميل. حدد موقع الملف داخل
Uploadالمجلد...PAGES.xmlباسم الملف ، كعنوان له. - اختر الملف وابدأ تحميل الملف.
يمكنك إزالة / حذف نماذج من الصفحات في مراحل لاحقة بمجرد التأكد من عمل القالب بنسبة 100٪ على النحو المطلوب. هذا يساعد حقا على تسريع قائمة المنتجات الخاصة بك وإعداد مخزن!


في ما يلي مثال على الصفحات التي تم إنشاؤها مسبقًا على تثبيت هذه الصفحات. يمكنك إزالة عمليات نشر المنتج النموذجية عندما تكون قد اختبرت جميع الوظائف أو إعداداتك المخصصة.

السماح لمدونة تغذية كاملة
Set blog settings to
Allow Blog Feed to Full in order to retrieve blog posts RSS feed from Blogger servers. Blog feed is required to allow theme functions to retrieve blog data.Make Blog Public
Make Blog
public assures a blog would have access to its data feed at Google/Blogger servers. If setting is set to Private, accessing your blog feed will be disabled & some theme plug-ins will not be running as expected.
Turn off Blogger Mobile Template
This theme is designed with a responsive framework & do not require the usage of Blogger mobile template. Turn off Blogger mobile theme by:-
- Go to
Settings,Mobilesection > click theGearbutton. - Select
No. Show desktop template on mobile devices. - Click
Save.


Add Meta Description
تلعب العلامات الوصفية دورًا حيويًا في إعطاء موقع Blogger (والصفحات) دفعة إضافية في صفحات نتائج محرك البحث. لتنشيط العلامات الوصفية في الأوصاف الوصفية للمدونة وصفحة المنتج: -
- الذهاب إلى
Settings>Search Preferences>Meta Tags - اكتب وصفًا موجزًا يصف متجر مدونتك في ما لا يزيد عن 160 كلمة.
- انقر فوق حفظ
ستؤدي إضافة علامات وصفية هنا إلى تنشيط
Search Descriptionالميزة الموجودة في الشريط الجانبي لتحرير المدونة. سيتيح هذا لمستخدمي المدونات إدراج وصف التعريف للمنتجات المخصصة قبل نشر أي مشاركة.
و

عند إنشاء مشاركة جديدة ،
في حالة عدم استخدام البيانات ، احتفظ بالحقل فارغًا. يتم العثور على مزيد من المعلومات في نص قالب المشاركة التلقائي الآلي للرجوع إليه.
To start writing a blog post, click somewhere in blog editor & select all contents. Press the Delete button on your keyboard to remove all loaded contents. Start typing in blog posts content inside the empty blog editor in Compose mode.
Upload post images using the built-in image upload button. Remove copied & paste text formatting by selecting the pasted text & click the "
Assign multiple Labels to a blog posts for categorization purposes.
For performance & best image display, upload posts images at min 600px in width and at image file size lower than 150kb. Use blog editor "Line Break" right after a few paragraphs of text or after the first image uploaded to your blog editor.

Auto Template Helperيستخدم للمساعدة على تسريع تحرير صفحة المنتج واسترداد البيانات من جدول البيانات المخصصة. لإضافة قالب المشاركة التلقائية: -- انتقل إلى ملف تنزيل المظهر
.../Helperومجلد مفتوح . - انسخ محتويات الملف إلى الحافظة الخاصة بك.
- انتقل إلى Blogger
Dashboard> clickSettings - اتجه نحو
Post & Comments> & عندPost Templateالنقر علىAddالرابط. - الصق
auto post templateعلامة المساعد المنسوخة داخل حقل textarea ، ثم انقر فوقSave Settings

نشر صفحة نشر منتج
عند إنشاء مشاركة جديدة ،
Auto Post Templateسيتم تحميلها تلقائيًا إلى محرر المدونة. تحرير / تغيير النصوص والبيانات لتخصيص قائمة منشورات المنتج. قم بتحميل الصورة باستخدام زر تحميل صورة محرر المدونة. في حالة عدم استخدام البيانات ، احتفظ بالحقل فارغًا. يتم العثور على مزيد من المعلومات في نص قالب المشاركة التلقائي الآلي للرجوع إليه.
IMPORTANT!- استخدمه
line breaksلفصل بيانات النشر من الصور للسماح بعرض الحد الأقصى من المشاركات في صفحات الفهرس / المعرض. Upload images larger than 600px in widthللسماح بعرض الصور المناسب. عيّن الصورة الأولى مع الخيار "Original Size" أو "X-Large".
نشر مدونة محددة الصفحة
To start writing a blog post, click somewhere in blog editor & select all contents. Press the Delete button on your keyboard to remove all loaded contents. Start typing in blog posts content inside the empty blog editor in Compose mode.
Upload post images using the built-in image upload button. Remove copied & paste text formatting by selecting the pasted text & click the "
Remove Formatting" button.Assign multiple Labels to a blog posts for categorization purposes.
For performance & best image display, upload posts images at min 600px in width and at image file size lower than 150kb. Use blog editor "Line Break" right after a few paragraphs of text or after the first image uploaded to your blog editor.

2.0 تخطيط الموضوع
يمكنك تعديل النص أو تحميل الصور لتخصيص مظهر متجر Blogger باستخدام عناصر واجهة مستخدم Blogger المثبتة مسبقًا مع المظهر. يمكنك إضافة عناصر واجهة مستخدم Blogger أو إزالتها أو إعادة ترتيبها لتخصيص التنسيق.
This Blogrcart theme comes with a custom dashboard with loads of indicators to help customize your Blogger store. Pre-assigned widgets have been included in order to speed up your blog store display & customization without editing a single Theme HTML code!

This BlogrCart theme Header holds 3 sections which are:-
Select preferred fonts & colors using Blogger Template Designer features to change template logo. The store name can be updated using Blogger Header widget located at dashboard >

Below is an example how to use Blogger Template Designer features from the dashboard.

Add text at Header widget to display as store description. Update text color and customization using Blogger Theme Designer.
Image uploaded using the assigned Header widget will be displayed as the header logo. To upload an image:-
Please consider to upload image at below 100kb in file size for best page rendering/display.
The search bar is embed in theme using a responsive pop over modal integrated with the theme Bootstrap3 responsive framework.
This theme already has pre-built checkout page by using this URL structure:-
No changes required.
A section specifically design to insert text or link text for promotional messages. Works great for store announcements or special offers.
Add in text/HTML inside this HTML/Javascript widget body to include text or uploaded images. Use line breaks (
In narrow screen sizes, this section will display a horizontal scroll bar to allow overflowed elements for example images to display accordingly.

- Blogger's Header widget to upload image or edit text as theme logo
- Buttons to toggle search bar & shopping cart.
- Ads Header section to display notifications or messages.
Blog Header Widget - Store Name
Select preferred fonts & colors using Blogger Template Designer features to change template logo. The store name can be updated using Blogger Header widget located at dashboard >
Layout.
Below is an example how to use Blogger Template Designer features from the dashboard.

Blog Store Description
Add text at Header widget to display as store description. Update text color and customization using Blogger Theme Designer.
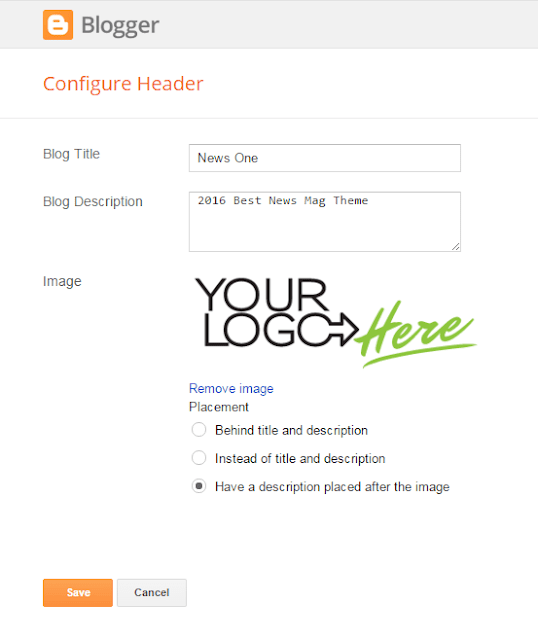
Upload Image at Header
Image uploaded using the assigned Header widget will be displayed as the header logo. To upload an image:-
- Click
Upload Imagelink - Find the image & select image to upload
- Choose
Instead of Title & Description - Click
Saveto save widget settings. - Click
Preview Templateor refresh browser window to view changes.
Please consider to upload image at below 100kb in file size for best page rendering/display.

Theme Search Bar
The search bar is embed in theme using a responsive pop over modal integrated with the theme Bootstrap3 responsive framework.
Button Link to Checkout Page
This theme already has pre-built checkout page by using this URL structure:-
http://<your-blog-name>.blogspot.com/page=checkoutNo changes required.
Ads Header Section
A section specifically design to insert text or link text for promotional messages. Works great for store announcements or special offers.
Add in text/HTML inside this HTML/Javascript widget body to include text or uploaded images. Use line breaks (
<br />) to increase the section gasp/paddings.In narrow screen sizes, this section will display a horizontal scroll bar to allow overflowed elements for example images to display accordingly.

Adding text and key-specific text to display a navigation link or create a dropdown link automatically using Blogger LinkList gadget. Below are the conditions:-
Supports unlimited links. Usage of the
On mobile devices, these main navigation links will be grouped with a menu button for toggling display.
Or while clicking the up or down arrow, press Alt at your keyboard (Windows) simultaneously. This will trigger a

The end results will look like so:-

- Adding a text in New Site Name field will display as top level navigation link.
- Add a text
before or aftera text link displays as a top level navigational link - Add an underscore "
_" (with no spaces) following text to start create a dropdown link. - An underscored "
_" (with no spaces) following textbefore/afteran underscored link text will continue to group & display as a dropdown link. - Add a text without underscore
afteran underscored text link will stop grouping dropdown links & displays as a top level navigational link.
Supports unlimited links. Usage of the
up & down arrows to re-arrange/organize links.On mobile devices, these main navigation links will be grouped with a menu button for toggling display.
Heads Up!: A common default browser behavior will occur when updating link placement during clicking the arrow link. To prevent this behavior press F12 & add in javascript handlers at browser console log to stop this "jumping" browser behavior.Or while clicking the up or down arrow, press Alt at your keyboard (Windows) simultaneously. This will trigger a
Save to PC pop over & continue to click the Cancel button.
The end results will look like so:-

This section is dedicated to use Blogger Image widget which users can add, remove, re-arrange upload images. Images used/uploaded preferably at min 1200px in width and/or a consistent height min 480px.
Click an Image widget, drag & drop the widgets according to desired location. Top most image widget locate at Image Slider section will display as the 1st image in slider.

At Layout, find Theme
Variable description:-
Display slider in a infinitive loop.
Displays the image slider dots navigation
Allows the image slider to autoplay.
The image slider transition speed.
Allows image slider to pause transitions if hovered.
By default the image slider displays full width to its parent container width. The image slider height depends on the uploaded image height -- where the largest image height will be considered as the maximum height for slider.
Upload a consistent image size for the slider at not lower than 1200px in width at 150Kb in image file size.
Use Blogger
.slider-wrapper .slick-slider { overflow:hidden; }
@media (min-width: 768px){
.slider-wrapper .slick-slider {
max-height: 480px;
}
}
Click
Update at highlighted yellow to your preferred height.
Adding Image in Slider
- At the assigned Image widget click
Edit. - Add text for title.This title will display as image slider title. (optional)
- Add text for caption. This caption text will display as secondary heading text for image slider (optional).
- Add a URL at link field. This will create a link using the text displayed at caption. (optional)
Remove Image From Slider
- Click
Editlink at Image widget located within theImage Slidersection. - At widget pop over, click the
Removebutton.
Re-arrange/Re-order Image Sliders - Image Slider Sequence.
Click an Image widget, drag & drop the widgets according to desired location. Top most image widget locate at Image Slider section will display as the 1st image in slider.

Customize Image Slider.
At Layout, find Theme
Plugins + Settings > Image Slider & Featured Settings widget and Edit below variables:-var MY_SLIDER = {
infinite: true,
dots: true,
autoplay: true,
autoplaySpeed: 3000,
pauseOnHover: true
};
Variable description:-
infinite: true,Display slider in a infinitive loop.
dots: true,Displays the image slider dots navigation
autoplay: true,Allows the image slider to autoplay.
autoplaySpeed: 3000,The image slider transition speed.
pauseOnHover: trueAllows image slider to pause transitions if hovered.
Adjusting Image Slider Height
By default the image slider displays full width to its parent container width. The image slider height depends on the uploaded image height -- where the largest image height will be considered as the maximum height for slider.
Upload a consistent image size for the slider at not lower than 1200px in width at 150Kb in image file size.
Use Blogger
Theme > Customize > Advanced > Add CSS to add your custom CSS..slider-wrapper .slick-slider { overflow:hidden; }
@media (min-width: 768px){
.slider-wrapper .slick-slider {
max-height: 480px;
}
}
Click
Apply To Blog and preview your changes. Update at highlighted yellow to your preferred height.
A section to display post by recent (default), by a certain Label, in random order. Uses Blogger's HTML/Javascript gadget to assign a Featured title and Label to extract specific product posts.

At the assigned HTML/Javascript widget:-
Adding Blogger HTML/Javascript widgets will allow users to create more featured sections at homepage.
Use variables below to assign parameters to override featured posts display & featured slider effects & timings.
At Layout, find
Variable description:-
Displays the product price (if available). Add
The maximum results of products/posts to display
The maximum amount of products/posts feed to retrieve.
Displays products/posts in random order. Add
The amount of characters for product/post titles.
The image width in pixels
The image height in pixels
The default image displayed if no image is found. A URL to an uploaded image.

Add Featured HTML/Javascript Widget
At the assigned HTML/Javascript widget:-
- Click
Edit - At widget title add text to display as featured title.
- At widget body add a specific Label (capital case sensitve)
- Click
Saveto save widget settings.
Create More Featured Sections.
Adding Blogger HTML/Javascript widgets will allow users to create more featured sections at homepage.
- Click the
Add Gadgetlink - Select
HTML/Javascriptwidget - At widget body add a specific Label (capital case sensitve)
- Click
Saveto save widget settings. - Drag & drop your new HTML/Javascript widget anywhere withing the Featured sections.
Customize Featured Section Display
Use variables below to assign parameters to override featured posts display & featured slider effects & timings.
At Layout, find
Theme Plugins + Settings > Image SLider & Featured Settings and click Edit to view below variables:-var MY_FEEDS = {
price: true,
max_results : 4,
max_feed: 20,
random : true,
title_chars : 35,
image_width: 420,
image_height: 320,
image_default : 'https://blogger.googleusercontent.com/img/b/R29vZ2xl/AVvXsEgDFpURPKY_UzrTwNq2T90Nw0eOA1sOQ33sQTfVl1Xyl49JjiUr5PuDIkJNOWOAnuS0_R8nkAVxeXtVYc1xvt6Ka0Te-q7wzIj9Uq3BTnujxjpsGN33x50wGlPk6n9Shy5jsir21lEwzYw/s72-c/placeholder-image.jpg'
};
Variable description:-
price: true,Displays the product price (if available). Add
false to disable price display.max_results : 4,The maximum results of products/posts to display
max_feed: 20,The maximum amount of products/posts feed to retrieve.
random : true,Displays products/posts in random order. Add
false to retrieve posts in published ordertitle_chars : 35,The amount of characters for product/post titles.
image_width: 420,The image width in pixels
image_height: 320,The image height in pixels
image_default : 'https://blogger.googleusercontent.com/img/b/R29vZ2xl/AVvXsEgDFpURPKY_UzrTwNq2T90Nw0eOA1sOQ33sQTfVl1Xyl49JjiUr5PuDIkJNOWOAnuS0_R8nkAVxeXtVYc1xvt6Ka0Te-q7wzIj9Uq3BTnujxjpsGN33x50wGlPk6n9Shy5jsir21lEwzYw/s72-c/placeholder-image.jpg'The default image displayed if no image is found. A URL to an uploaded image.
Pre installed section to easily include custom text, advertisement banners, promotion updates using Blogger HTML/Javascript gadget.

Text entered here will display throughout the entire blog. If no text or leaving this widget body empty will not allow the gadget to be saved - a default Blogger gadget behavior. To save an empty offer section HTML/Javascript gadget
To create a link able banner add, add a link with an uploaded image URL to display an image or insert your ads HTML markup to display as your ads. Below is an example:-
Click
You can add any type of text or HTML markup using available Blogger widgets. There are no specific styling designated for this section, which allows you to include your own styling accordingly.

Text entered here will display throughout the entire blog. If no text or leaving this widget body empty will not allow the gadget to be saved - a default Blogger gadget behavior. To save an empty offer section HTML/Javascript gadget
remove gadget title & add <!-- --> inside the gadget body > click Save. This section will not display at your blog.To create a link able banner add, add a link with an uploaded image URL to display an image or insert your ads HTML markup to display as your ads. Below is an example:-
<div class="text-center"><a href="http://url-to-link-to.com">
 <img src="http://url-to-an-uploaded-image.jpg" alt="Some image title" />
</a></div>
Click
Save to save or update your custom edits.You can add any type of text or HTML markup using available Blogger widgets. There are no specific styling designated for this section, which allows you to include your own styling accordingly.
المحتوى / المدونة
استخدم إعدادات أداة Blogger Blog لتخصيص وظائف النشر في Blogger المختلفة والتي تشمل: -
- كمية المشاركات التي يتم عرضها في الصفحة الرئيسية أو صفحات الفهرس.
- تمكين أو تعطيل رموز المشاركة.
- تمكين أو تعطيل مشاركة المؤلف
- تمكين أو تعطيل تعليقات النشر
في صفحات نشر المدونة ، يتم تضمين كل ذيل المشاركة. ولكن على صفحات المنتج ، تم حذف بعض وظائف post poster الافتراضية لأسباب تتعلق بالأداء.
تنشيط وظيفة Poster في Blogger المتاحة من لوحة المعلومات في أداة Blog1.
تمكين أداة الوصول السريع
تم تثبيت أداة الوصول السريع مسبقًا مع هذا المظهر. هذا سوف يسمح لك: -
- تعديل النشر الحالي على الفور
- وصول لوحة القيادة تخطيط على الفور
- الوصول إلى موضوع تحرير HTML على الفور
- الوصول إلى لوحة التعليقات على الفور
- الوصول إلى صفحة الويب Bootstrap3 والأدوات
- الوصول إلى مراجع صفحة الويب الرائعة
- مساعدة سريعة والدعم
لتمكين هذه الوظيفة ، انتقل إلى
Blog1عنصر واجهة المستخدم> تحت Post Page Options> وضع علامة في " Show Quick Edit"> ثم انقر فوق Saveلحفظ هذه القطعة.

عرض تصنيف المنتجات وعرضها (صفحات الفهرس)
هذا هو عنصر واجهة مستخدم Blogger Label مخصص وموجود / تم تعيينه أعلاه
Blog1القطعة. يتم عرض هذه القطعة في صفحات الفهرس. هذه القطعة سوف تسمح لك: -- عرض خيارات فرز المنتجات
- تعيين وعرض تصنيفات Blogger للتصنيف.
لتعيين تسمية محددة للعرض ، في القطعة المعينة ...
- انقر
Edit - اختر
Selected Labels - انقر فوق الرابط تحرير.
- في
Select Label to Showالقسم - حدد تصنيفاتك للعرض
- انقر
Doneلحفظ اختيارك - انقر
Saveلحفظ الأداة الخاصة بك.
معلومات المنتج (منشورات المنتج)
يعرض قسمًا نصيًا عامًا في صفحات المنتج أسفل سمات / بيانات المنتج. سيعمل هذا التبويب / الدرج مثل العرض على تجميع جميع عناصر HTML / Javascript المصغرة وعرضها كميزة درج كلفي لمشاركات المنتجات.

Sidebar
Displayed on the left/right side on index pages & static page. Add/ remove/ arrange any Blogger widgets accordingly. Some default Blogger widgets custom styles have already been pre-assigned.

Two sidebar section available to display on separate pages.
- Sidebar (Index Page) indicates widget included here will display at indexed pages.
- Sidebar (Static Page) indicates widget included here will display at static pages.
Examples Display Icons Using LinkList Widget.
Display a social media icon: Facebook
- At New Site Name field add
<i class="fa fa-facebook fa-lg"></i> - At New Site URL field add the
full URLto your profile page. - Click
Save Link.
Display a social media icon: Facebook (squared)
- At New Site Name field add
<i class="fa fa-facebook-square fa-lg"></i> - At New Site URL field add the
full URLto your profile page. - Click
Save Link.
Display a social media icon: Facebook (3x larger than the font size)
- At New Site Name field add
<i class="fa fa-facebook fa-3x"></i> - At New Site URL field add the
full URLto your profile page. - Click
Save Link.
Display a social media icon: Facebook (squared & 3x larger than the font size)
- At New Site Name field add
<i class="fa fa-facebook-squared fa-3x"></i> - At New Site URL field add the
full URLto your profile page. - Click
Save Link.
Select or choose over 500+ icons by using the icons "
tag" names & mark-up provided above provide by the great people from Font Awesome http://fontawesome.io/icons/
This widget is dedicated to display at this URL
Select the Label of choice to display posts by categories automatically at this page. To select a particular Label to display:-
At the assigned page view, automatically posts under the selected Labels will be shown.

At Layout, find
Variable Description
The maximum results of products/posts to display
The maximum amount of products/posts feed to retrieve.
Displays products/posts in random order. Add
The amount of characters for product/post titles.
The image width in pixels
The image height in pixels
The default image displayed if no image is found. A URL to an uploaded image
http://<your-blog-name>.blogspot.com/search/label/All .Select the Label of choice to display posts by categories automatically at this page. To select a particular Label to display:-
- Click
Edit - At "Show" select "
Selected Labels" Tickon preferred Label to show posts- Click
Done - Click
Saveto save widget
At the assigned page view, automatically posts under the selected Labels will be shown.

Customizing Displayed posts by Categories.
At Layout, find
Theme Plugins + Settings > Image Slider & Featured Settings and click Edit to view below variables:-var MY_CATEGORY_PAGE = {
max_results : 6,
max_feed: 20,
random : true,
title_chars : 35,
image_width: 420,
image_height: 320,
image_default : 'https://blogger.googleusercontent.com/img/b/R29vZ2xl/AVvXsEgDFpURPKY_UzrTwNq2T90Nw0eOA1sOQ33sQTfVl1Xyl49JjiUr5PuDIkJNOWOAnuS0_R8nkAVxeXtVYc1xvt6Ka0Te-q7wzIj9Uq3BTnujxjpsGN33x50wGlPk6n9Shy5jsir21lEwzYw/s72-c/placeholder-image.jpg'
};
Variable Description
max_results : 4,The maximum results of products/posts to display
max_feed: 20,The maximum amount of products/posts feed to retrieve.
random : true,Displays products/posts in random order. Add
false to retrieve posts in published ordertitle_chars : 35,The amount of characters for product/post titles.
image_width: 420,The image width in pixels
image_height: 320,The image height in pixels
image_default : 'https://blogger.googleusercontent.com/img/b/R29vZ2xl/AVvXsEgDFpURPKY_UzrTwNq2T90Nw0eOA1sOQ33sQTfVl1Xyl49JjiUr5PuDIkJNOWOAnuS0_R8nkAVxeXtVYc1xvt6Ka0Te-q7wzIj9Uq3BTnujxjpsGN33x50wGlPk6n9Shy5jsir21lEwzYw/s72-c/placeholder-image.jpg'The default image displayed if no image is found. A URL to an uploaded image
This widget is dedicated to display at this URL
Add text to display at checkout page at the assigned HTML/Javascript gadget
Edit text inside this markup to display when shopping cart is empty.

If Discounts is enabled, text inside this widget is used. Edit the highlighted text accordingly.
http://<your-blog-name>.blogspot.com/page=checkout.Add text to display at checkout page at the assigned HTML/Javascript gadget
Edit text inside this markup to display when shopping cart is empty.
<div class='cart-empty' style='display:none'>
  <p class='lead'>
    Currently shopping cart is empty.
  </p>
  <a class='btn btn-primary btn-custom' href='/search/label'>Continue Shopping</a>
  <br />
  <br />
  <br />
</div>

Discounts Alert Texts
If Discounts is enabled, text inside this widget is used. Edit the highlighted text accordingly.
<div class="alert alert-success disc success" style="display:none;">
Discount applied!. Your discount code have been accepted & cart have been updated.
</div>
<div class="alert alert-warning disc invalid-quantity" style="display:none;">
Cart items exceeds max quantity for discounts. Please reduce cart items to continue.
</div>
<div class="alert alert-danger disc invalid-code" style="display:none;">
Invalid or expired discount code.
</div>
<div class="alert alert-warning disc invalid-totals" style="display:none;">
Cart totals have not reached minimum amount for discounts.
</div>
<div class="alert alert-warning disc invalid-max-totals" style="display:none;">
Cart totals have reached maximum amount for discounts. Please reduce items to continue.
</div>
This widget is dedicated to display at this URL
Add text to display at contact page at the assigned HTML/Javascript gadget
Find the Contact Form gadget to click
This widget is also used with checkout form and required.

http://<your-blog-name>.blogspot.com/page=contact.Add text to display at contact page at the assigned HTML/Javascript gadget
Enabling Contact Form Widget
Find the Contact Form gadget to click
Edit and then Save this widget. This will allow this widget to register with your blog settings.This widget is also used with checkout form and required.

Pre installed section to easily include custom text, advertisement banners, promotion updates using Blogger HTML/Javascript gadget.

Text entered here will display throughout the entire blog. If no text or leaving this widget body empty will not allow the gadget to be saved - a default Blogger gadget behavior. To save an empty offer section HTML/Javascript gadget
To create a link able banner add, add a link with an uploaded image URL to display an image or insert your ads HTML markup to display as your ads. Below is an example:-
Click
You can add any type of text or HTML markup using available Blogger widgets. There are no specific styling designated for this section, which allows you to include your own styling accordingly

Text entered here will display throughout the entire blog. If no text or leaving this widget body empty will not allow the gadget to be saved - a default Blogger gadget behavior. To save an empty offer section HTML/Javascript gadget
remove gadget title & add <!-- --> inside the gadget body > click Save. This section will not display at your blog.To create a link able banner add, add a link with an uploaded image URL to display an image or insert your ads HTML markup to display as your ads. Below is an example:-
<div class="text-center"><a href="http://url-to-link-to.com">
 <img src="http://url-to-an-uploaded-image.jpg" alt="Some image title" />
</a></div>
Click
Save to save or update your custom edits.You can add any type of text or HTML markup using available Blogger widgets. There are no specific styling designated for this section, which allows you to include your own styling accordingly
3 columns have been assigned to display at theme footer with different column sizes. For optimal footer gadget content display, the columns spreads in multiple widths on smaller screen sizes.Add/ remove/ arrange any Blogger default widgets here accordingly. Some default Blogger widgets custom styles already has been pre assigned.
Upon initial theme install, sample Blogger widgets have been assigned. You can activate these widgets by clicking the
Edit link & Save it.Users can add in more widgets by clicking the
Add a Gadget link & select your required widget.
Examples Display Icons Using LinkList Widget.
Display a social media icon: Facebook
- At New Site Name field add
<i class="fa fa-facebook fa-lg"></i> - At New Site URL field add the
full URLto your profile page. - Click
Save Link.
Display a social media icon: Facebook (squared)
- At New Site Name field add
<i class="fa fa-facebook-square fa-lg"></i> - At New Site URL field add the
full URLto your profile page. - Click
Save Link.
Display a social media icon: Facebook (3x larger than the font size)
- At New Site Name field add
<i class="fa fa-facebook fa-3x"></i> - At New Site URL field add the
full URLto your profile page. - Click
Save Link.
Display a social media icon: Facebook (squared & 3x larger than the font size)
- At New Site Name field add
<i class="fa fa-facebook-squared fa-3x"></i> - At New Site URL field add the
full URLto your profile page. - Click
Save Link.
Select or choose over 500+ icons by using the icons "
tag" names & mark-up provided above provide by the great people from Font Awesome http://fontawesome.io/icons/
Quick Recap:
- Add, re-arrange & remove any Blogger widgets.
- Use Font Awesome markup to display icons and sizing it.
- Add underscore before the text at Label widget title to display a show and hide group of links.
- Select the required links to show by using Label widget Select Labels functionalities.
3.0 إعداد مخزن
إعداد متجرك في Blogger واستخدام العديد من ميزات التجارة الإلكترونية التي تأتي مثبتة مسبقًا مع مظاهر BlogrCart.
جميع إعدادات المتجر متاحة في Layout ، وابحث
Theme Plugins + Settings > Store Settings وانقر فوق Edit لعرض المتغيرات أدناه: -var MY_STORE = { currency: 'USD'، checkout: { type: 'PayPal'، email: 'you@yours.com'، success: 'http://your-blog-name.blogspot.com/p/success. html '، cancel:' http://your-blog-name.blogspot.com/p/cancel.html ' }، language:' english-us '، // language to use at paypal checkout page taxRate: 0.06، taxShipping : false، alt_currency: false، debug: false، reload: 4000، status: ['sold'، 'out'] // target status when product sold out to disable }؛
currency: 'USD',Whereas USD is referred to your store currency. Below are preset currencies pre-installed with this BlogrCart theme.
Paypal Supported currencies
USD - US Dollar (default)AUD - Australian DollarBRL - Brazilian RealCAD - Canadian DollarCZK - Czech KorunaDKK - Danish KroneEUR - EuroHKD - Hong Kong DollarHUF - Hungarian ForintILS - Israeli New SheqelJPY - Japanese YenMXN - Mexican PesoNOK - Norwegian KroneNZD - New Zealand DollarPLN - Polish ZlotyGBP - Pound SterlingSGD - Singapore DollarSEK - Swedish KronaCHF - Swiss FrancBTC - BitcoinMYR - Ringgit MalaysiaPHP - Philipines PesoTWD - Taiwan New DolarPaypal Unsupported Currencies
Strongly recommend to enable Paypal checkout to non supported currency -- Refer Paypal Setup section below.INR - India RupeeVND - Vietnam DongBND - Brunei DollarIDR - Indonesia RupiahNGN - Nigeria NairaTHB - Thai BahtRUB - Russia RublePKR - Pakistani RupeeBDT - Bangladesi TakaCNY - Chinese YuanAlternative Currencies Format
This theme fully supports alternative currency format to display decimals, delimiter & calculate accordingly. For example when IDR (Indonesia Rupiah) currency is in use.
alt_currency: false,Set above variable to
true to allow display of alternate currecy format display.Non Preset Currency (Custom Currency)
Setting up currencies not listed above can be done by tapping in the currency function. Add below functions inside any HTML/javascript widget at the very bottom of theme:-
<script>
$(function(){
  simpleCart.currency ({
    code: 'AAA',
    symbol: '$',
    name: 'Currency Name',
    decimal: '.',
    delimiter: ',',
    after: false
  });
});
</script>
The variables above is self-explanatory. Edit accordingly to override any default currency set earlier.
This BlogrCart theme supports 3 type of shipping calculations & they are:-
When above variables is assigned in MY_STORE setup, the values will be passed to shopping cart & calculated accordingly.
To add a specific shipping methods, add the shipping variables inside MY_STORE setup:-
Note: when
More shipping options can be applied to BlogrCart themes, for example, shipping by weight, shipping by zoning etc. Additional plugins can be developed & designed according to user preferred shipping results.
Please contact theme developer for further instructions.
- Flat Rate shipping -
shippingFlatRate - Calculate shipping by quantity of items -
shippingQuantityRate - A percentage based shipping -
shippingTotalRate
When above variables is assigned in MY_STORE setup, the values will be passed to shopping cart & calculated accordingly.
To add a specific shipping methods, add the shipping variables inside MY_STORE setup:-
var MY_STORE = {

  ... {{ initial setup variables }}..

  shippingFlatRate: 10,
};
Note: when
shippingTotalRate is applied, the value is percentage based, which means the value 0.1 equals to 10/100 percent.Custom Shipping Options
More shipping options can be applied to BlogrCart themes, for example, shipping by weight, shipping by zoning etc. Additional plugins can be developed & designed according to user preferred shipping results.
Please contact theme developer for further instructions.
taxRate: 0.06,The tax rate to be applied at checkout. The value is percentage where ie.
0.05 equals to 5/100 percent.Add
0 to disable tax at checkout.taxShipping: false,To allow tax to be calculated with shipping. Set to
true to enable tax with shipping.checkout: {
type: 'PayPal',
email: 'you@yours.com',
success: 'http://your-blog-name.blogspot.com/p/success.html',
cancel: 'http://your-blog-name.blogspot.com/p/cancel.html'
},
email: 'you@yours.com',The email used to receive transactions at Paypal. Use this default email address for testing purposes.
success: 'http://your-blog-name.blogspot.com/p/success.html',The return URL after a successful transaction at Paypal.
cancel: 'http://your-blog-name.blogspot.com/p/cancel.html'The return URL if transaction at Paypal is unsuccessful. This URL will automatically applied at Paypal checkout page
Return to <store> link.Non Supported Paypal Currencies
For non supported store currencies who wish to auto convert to USD at Paypal, add below variables inside MY_STORE setup:-
var MY_STORE = {

  ... {{ initial setup variables }}..

  paypal: {
    alt_currency: true,
    alt_currency_code: 'USD',
    alt_currency_rate: 3.35,
    cc_mail: false
  }
};
Variable Description
alt_currency_rate: 3.35,The currency rate to USD from current store currency.
cc_mail: falseAllows to "quietly" send a copy to store email if value is
true when users checks out to Paypal. This helps in attending abandon checkout at your store.Disabling Paypal Checkout.
Add below CSS at
Theme > Customize > Advanced > Add CSS[data-checkout=paypal] { display:none!important; }
Then click
Apply to Blog.
The send email notifier is sending shopping cart & checkout form data to the email addresses registered with the blog. No 3rd party application/script required.
The send email success page shares the same URL as Paypal checkout variables after form submissions.
To allow display of contents entered in from fields. Useful to check if data from form fields will be passed to email when Send Order button is clicked.
The timing in milliseconds the checkout page will redirect upon successful sent order mail.
Add below CSS at
Then click
The send email success page shares the same URL as Paypal checkout variables after form submissions.
debug: false,To allow display of contents entered in from fields. Useful to check if data from form fields will be passed to email when Send Order button is clicked.
reload: 4000,The timing in milliseconds the checkout page will redirect upon successful sent order mail.
Disabling Send Email Order Checkout.
Add below CSS at
Theme > Customize > Advanced > Add CSS[data-checkout=email] { display:none!important; }
Then click
Apply to Blog.
At Layout, find
Variable Description
Enable discount code session at checkout. Add
Set to
The discount code to use.
The duration in days the discount code will be expired.
The max amount of item in cart to enable discount.
The min totoals in cart to enable discounts.
The max totals in cart to allow for discounts
The amount in percent to allow discount. 10 = 10%.
Important:
This discount plugin is not a full proof way to provide a secured discount session at checkout at your store -- but it gets the job done by engaging repeating customers effectively.
Please provide clear information to your users on the conditions that may be applied when using discount codes. Be stern to your users if any suspicious or unusual actions had been taken.
Obfuscate your discount code variables above by using this tool so it will make it harder for the naked eye.
To edit alert text warnings please refer Checkout & Discount widget at Section 2.0
Theme Plugins + Settings > Store + Discounts Settings and click Edit to view below variables:-var MY_DISCOUNTS = {
code : true,
debug : false,
key : 1234,
duration : 1,
limit : 5,
min_totals: 10,
max_totals: 1000,
discount : 10
};
Variable Description
code : true,
Enable discount code session at checkout. Add
false to disable.debug : false,Set to
true allows to view current discount session settings at checkout page.key : 1234,
The discount code to use.
duration : 1,The duration in days the discount code will be expired.
limit : 5,The max amount of item in cart to enable discount.
min_totals: 10,The min totoals in cart to enable discounts.
max_totals: 1000,The max totals in cart to allow for discounts
discount : 10The amount in percent to allow discount. 10 = 10%.
Important:
This discount plugin is not a full proof way to provide a secured discount session at checkout at your store -- but it gets the job done by engaging repeating customers effectively.
Please provide clear information to your users on the conditions that may be applied when using discount codes. Be stern to your users if any suspicious or unusual actions had been taken.
Obfuscate your discount code variables above by using this tool so it will make it harder for the naked eye.
To edit alert text warnings please refer Checkout & Discount widget at Section 2.0
Locating Checkout Form
Important: Removing send order form input elements may cause shopping cart & checkout order form function failures as this is using Blogger widget default functions. Editing the input labels and/or placeholders will not.Locating Theme Plug-in Libraries
Go to
Template HTML > click Jump to Widget tab > select HTML89 > expand <b:includable id='js-libs'>...</b:includable>Automatically Empties Cart after Success Form Submission
Applies if you have setup a different success page URL after the template Pages install.
This theme comes with theme utility helper to empty shopping cart automatically after a successful checkout form submission.
To empty the shopping cart automatically, at any static/post page in your blog, add the theme utility helper below inside the blog page editor body in the HTML view.
<div id="empty-shopping-cart"></div>
Click
Update to Save your static page & preview your changes.Customizing Shopping Cart Text
Go to
Layout > find Shopping Cart widget click EditEdit or add any text inside this widget will display at shopping cart pop over modal.
موضوع التخصيص
تجاوز تكوينات موضوع الافتراضية BlogrCart باستخدام المتغيرات دون أي برمجة ! قائمة المتغيرات المعينة والقيم المتاحة لتتضمن مع وصف التفاصيل.
At Layout, find
Displays a collection of published posts related to the posts displayed using the last Label the post is assigned to. To custom set the related post title:-
The text displayed as headers for related posts.
Text displayed at saved indicator
The image zooming size/ratio when hovered upon.
The max rating for a product
The Font Awesome icon class name for empty stars
The Font Awesome icon class name for filled stars.
Theme Plugins + Settings > Image Slider & Featured Settings and click Edit to view below variables:-var MY_PRODUCT_PAGE = {
save_text : 'Save ',
scale : 1.8,
limit: 5,
empty: 'fa fa-star-o',
active: 'fa fa-star',
heading: 'Related Products',
};
Related Posts
Displays a collection of published posts related to the posts displayed using the last Label the post is assigned to. To custom set the related post title:-
heading: 'Related Products',The text displayed as headers for related posts.
Product Save Text
save_text : 'Save ',Text displayed at saved indicator
Product Image Zoom
scale : 1.8,The image zooming size/ratio when hovered upon.
Product Ratings
limit: 5,The max rating for a product
empty: 'fa fa-star-o',The Font Awesome icon class name for empty stars
active: 'fa fa-star',The Font Awesome icon class name for filled stars.
This theme offers loads of search engine friendly options to give that extra boost for your Blog powered store pages.
Use Bootstrap3 class naming convention to assign how your text will display. Here are examples typography

This theme also uses
To customize the custom meta tags, go to
Replace highlighted orange to your Twitter handle.
Replace highlighted orange to your upload image. Preferred images uploaded via blogger post editor. Best image size
Replace highlighted orange to your upload image. Preferred images uploaded via blogger post editor. Best icon size
Replace highlighted orange to your preferred HEX color code.
Images play an important role to bring your blog content more closely to users/readers at your blog, either in PC or even mobile. Crisp, clear & large images will attract more than text only content, which also supports the topic you are addressing.
To optimize any images uploaded, reduce the image file size to below 150kb in making sure the images will load smoothly on slower internet connections. especially on mobile devices.
Before uploading to your blog, use free services like https://tinypng.com/ to automatically compress you large images file size without deprecating the original image output.
This helps to reduce bandwith usages on Blogger servers & also reduce the amount of image space usages on your Google image online storage.
404 Page Not Found
Error page has been assigned with this theme using Blogger's existing functions. To add text/HTML to error page go toSettings > Search Preference > under Errors and redirection section > click the Custom Page Not Found link > enter the text or HTML required.Use Bootstrap3 class naming convention to assign how your text will display. Here are examples typography

Common Meta Tags
Common meta tags used by search engines robots have been pre-installed on all pages made at your blog store. The <title> and <description> tags rendered dynamically & unique for each blog pages.This theme also uses
fallback texts if however users forgotten to write in their custom meta description which is available at Blogger Editor sidebar.Fallback includes a default image meta tag(s) in order for search engines to relate your blog pages with the image you have uploaded via Blog Editor for a specific page. This makes it easy for your to share your product posts to social media too!To customize the custom meta tags, go to
Theme > Edit HTML > find <head> & locate below mark-up:-Twitter site and creator meta tags
<b:comment>Meta Types</b:comment>
<meta content='@irsahindesigns' name='twitter:site'/>
<meta content='@irsahindesigns' name='twitter:creator'/>
Replace highlighted orange to your Twitter handle.
Meta Product/Page Image Fallback
<b:comment>Meta Images: Add image URL at var="defaultimage"...</b:comment> value='"https://blogger.googleusercontent.com/img/b/R29vZ2xl/AVvXsEgDFpURPKY_UzrTwNq2T90Nw0eOA1sOQ33sQTfVl1Xyl49JjiUr5PuDIkJNOWOAnuS0_R8nkAVxeXtVYc1xvt6Ka0Te-q7wzIj9Uq3BTnujxjpsGN33x50wGlPk6n9Shy5jsir21lEwzYw/s1600/placeholder-image.jpg"'
Replace highlighted orange to your upload image. Preferred images uploaded via blogger post editor. Best image size
1200px in width & 900px in height at 4:3 image ratio.Mobile Apps Icon
<b:comment>Icons: Add URL to image/icons at var="icon"...</b:comment> value='"https://blogger.googleusercontent.com/img/b/R29vZ2xl/AVvXsEjVCaMl7_oJPfk7O5lS2svrFVZT5v9Kp3EVv8MLqfz_0hrSBFiG2qjWYicJXWarnfkkpC3LAilAr9dK_HSH7X6E1NZfEHvSP1ERT52fEowgzVDW2Fpz96Z-i4oKCrTAGiUpX4F3RKzBiL8/s1600/blogr-amp-215.png"'
Replace highlighted orange to your upload image. Preferred images uploaded via blogger post editor. Best icon size
215px in width & 215px in height at 1:1 image ratio.Mobile Browser Bar Color
<b:comment>Mobile Browser: Add color in Hex at var="themecolor"...</b:comment> value='"#FF5722"'
Replace highlighted orange to your preferred HEX color code.
Search Engine Meta Data
<b:comment>Search Engine Meta Data: Add Store Contact Number...</b:comment> <script type='application/ld+json'> { ... {{ codes }} ... "contactPoint": { "@type": "ContactPoint", "telephone": "+1-401-555-1212", "contactType": "customer service" } } </script>
Optimize Uploaded Post Images
Images play an important role to bring your blog content more closely to users/readers at your blog, either in PC or even mobile. Crisp, clear & large images will attract more than text only content, which also supports the topic you are addressing.
To optimize any images uploaded, reduce the image file size to below 150kb in making sure the images will load smoothly on slower internet connections. especially on mobile devices.
Before uploading to your blog, use free services like https://tinypng.com/ to automatically compress you large images file size without deprecating the original image output.
This helps to reduce bandwith usages on Blogger servers & also reduce the amount of image space usages on your Google image online storage.
Keren banget lebih keren kalo ada fiture blognya
ReplyDelete